TextField 文本框
用户可以在文本框内输入或编辑文字。
用户可以通过文本框在界面中输入文本。 通常,我们会在表单域和对话框中使用它们。
<form className={classes.root} noValidate autoComplete="off">
  <TextField id="outlined-basic" label="Outlined" />
  <TextField id="filled-basic" label="Filled" variant="filled" />
  <TextField id="standard-basic" label="Standard" variant="standard" />
</form>
友情提示: Material 设计指南不再记录 TextField 的 standard 布局,(原因见此),但是 Material-UI 会继续支持此布局。
Form props 表单的属性
Standard form attributes are supported e.g. required, disabled, type, etc. as well as a helperText which is used to give context about a field's input, such as how the input will be used.
多行属性
multiline 属性将文本字段转换为 <textarea> 元素。 除非设置了 rows 属性,否则文本字段的高度会动态匹配其内容(使用 TextareaAutosize 时)。 你可以使用 rowsMin 和 rowsMax 属性来绑定它。
Select 选择属性
使用 select 属性的时候,您可以在文本框内插入一个 Select 组件。
Kg
Kg
Weight
$
Kg
Kg
Weight
$
Kg
Kg
Weight
$
filled 变体的输入高度可以通过在外部渲染标签来降低。
布局
通过使用 margin 属性,你可以改变输入框的垂直间距。 若您使用 none (默认选项),将不会在 FormControl 上添加间距, 相对来说,使用 dense 和 normal 会添加间距。 使用 dense 和 normal 会更改其他的样式,以符合规范。
我们提供了fullWidth 属性,使用它的时候,输入框会占据整个容器的宽度。
Full width!
Some important text
Some important text
Some important text
Full width!
Some important text
Some important text
Some important text
Full width!
Some important text
Some important text
Some important text
Components 组件
TextField 是由一些较小的组件组成的 ( FormControl, Input, FilledInput, InputLabel, OutlinedInput, and FormHelperText ) ,而你可以直接使用这些小的组件,来自定制你的表单域输入框。
您可能注意到了, 和原生的 HTML input 组件相比,TextField 组件缺失了一些属性。 这是故意为之的。 该组件只负责处理最常用的一些属性,如果有需求,用户可以自行调用下面演示的一些组件。 但是同时, 为了避免过于模版化,您仍然可以使用 inputProps (和 inputProps, InputLabelProps 属性) 来控制原生组件的属性。
自定义输入
你可以参考以下一些例子来自定义组件。 您可以在 重写文档页面 中了解更多有关此内容的信息。
自定义不会停留在CSS,您可以使用组合来构建自定义组件,让您的 app 独树一帜。 接下来的这个示例受到了 Google 地图的启发,它使用了 InputBase 组件。
🎨 如果您还在寻找灵感,您可以看看 MUI Treasury 特别定制的一些例子。
设计局限
缩放
输入框标签的 "shrink" 状态并不总是正确的。 输入标签应在输入框显示内容的时候立即收缩。 在某些情况下,我们无法确定输入框的 "shrink" 状态 (如数字输入、日期时间输入、条带输入)。 这样一来,有可能出现重叠的现象。
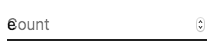
若要解决此问题,您可以在输入框的标签上强制赋予 "shrink" 状态。
<TextField InputLabelProps={{ shrink: true }} />或
<InputLabel shrink>计数</InputLabel>悬浮的标签
悬浮的标签被定义了一个绝对的位置,这样的话,它将不会影响到页面的整体布局。 想要正确显示你的组件,你只要确保输入框的比输入标签大。
type="number"
type="number" 的输入存在潜在的可用性问题:
- 这将允许某些非数字字符('e', '+', '-', '.') 并且丢失其他字符 并且丢失其他字符 并且丢失其他字符
- 滚动增加/减少数字的功能可能会导致意外和难以察觉的变化。
有关该话题的更多信息 - 请参阅 GOV.UK 设计系统团队的 这篇文章,来了解更详细的解释。
对于数字验证,一个可行的替代方法是使用默认的 type="text" 和 pattern 属性,例如:
<TextField inputProps={{ inputMode: 'numeric', pattern: '[0-9]*' }} />以后我们可能会提供 数字(number)输入组件。
辅助文本
辅助文本属性会影响文本字段的高度。 如果两个文本字段并排放置,一个有辅助文本,另一个没有,那么它们的高度就会不同。 例如:
Please enter your name
<TextField
  helperText="Please enter your name"
  id="demo-helper-text-misaligned"
  label="Name"
  variant="standard"
/>
<TextField
  id="demo-helper-text-misaligned-no-helper"
  label="Name"
  variant="standard"
/>
您可以使用 error 属性来切换错误的状态,同时也可以使用 helperText 属性来给用户提供错误的提示信息。
Please enter your name
<TextField
  helperText="Please enter your name"
  id="demo-helper-text-aligned"
  label="Name"
  variant="standard"
/>
<TextField
  helperText=" "
  id="demo-helper-text-aligned-no-helper"
  label="Name"
  variant="standard"
/>
与第三方 input 库的整合
您可以使用第三方库来格式化您的输入框。 只要确保在整合的时候,您提供了一个带有 inputComponent 属性的自定义 <input> 元素。
下面的演示使用 react-text-mask 和 react-number-format 这两个基本库。 同样的概念可以适用于 这个例子:react-stripe-element。
第三方所提供的输入组件应该暴露一个 ref,其值实现以下接口:
interface InputElement {
  focus(): void;
  value?: string;
}
const MyInputComponent = React.forwardRef((props, ref) => {
const { component: Component, ...other } = props;
// 实现 `InputElement` 接口
React.useImperativeHandle(ref, () => ({
focus: () => {
// 在这里提供第三方组件的聚焦(focus)渲染方法
},
// 隐藏值,例如 react-stripe-elements
}));
// `Component` 将会是下面例子中的 `SomeThirdPartyComponent`
return <Component {...other} />;
});
// 使用
<TextField
InputProps={{
inputComponent: MyInputComponent,
inputProps: {
component: SomeThirdPartyComponent,
},
}}
/>;无障碍设计
为了确保您的文本框可提供无障碍访问,输入框必须和标签以及帮助文本连在一起调用。 而且,深层的 DOM 节点应该遵循这个结构。
<div class="form-control">
  <label for="my-input">电子邮件</label>
  <input id="my-input" aria-describedby="my-helper-text" />
  <span id="my-helper-text">我们绝不会分享您的邮件地址。 </span>
</div>- 如果您使用的是
TextField组件,那您只需提供独特的id。 - 如果您正在构造一个组件:
<FormControl>
  <InputLabel htmlFor="my-input">电子邮件</InputLabel>
  <Input id="my-input" aria-describedby="my-helper-text" />
  <FormHelperText id="my-helper-text">我们绝不会分享您的邮件地址。</FormHelperText>
</FormControl>
补充项目
对于更高级的用例,您可以利用:
- react-hook-form:用于表单验证的 React 钩子。
- formik-material-ui:用于 formik 和 Material-UI 捆绑使用。
- redux-form-material-ui:用于 Redux Form 和 Material-UI 捆绑使用。
- mui-rff:用于 React Final Form 和 Material-UI 捆绑使用。